이번 솝트 세미나에서 중심적으로 다룬게 프래그먼트와 리사이클러뷰였다.
근데 (아쉽게도) 리사이클러뷰로 블로그에 글을 쓴 적이 있으므로 나중에 그 글을 수정하기로 마음먹고
한번도 작성한 적 없는 프래그먼트를 정리를 해보겠다!!
1. 프래그먼트란?
액티비티 내에서 Activity UI의 일부를 나타내기 위해 고안된 개념.
즉, 하나의 액티비티가 여러 개의 화면을 가지도록 만들기 위해 고안된 개념.
2. 프래그먼트의 특징
✅ 하나의 프래그먼트를 여러 액티비티에서 재사용할 수 있다.
✅ 자체적인 레이아웃과 수명 주기를 가지는 독립적인 모듈이다.
✅ 액티비티 실행 중에 추가, 교체 및 삭제가 가능하다.
✅ 액티비티 내에서 호스팅되어야 하며 해당 프래그먼트의 수명 주기는 호스트 액티비티의 수명 주기에 직접적으로 영향을 받는다. 즉, 액티비티가 일시정지가 되면, 그 안의 프래그먼트도 일시정지된다.
3. 프래그먼트의 생명주기
❗❗ Fragment는 Activity에 소속되는 것이므로 Activity와 연관된 생명주기를 가진다 ❗❗
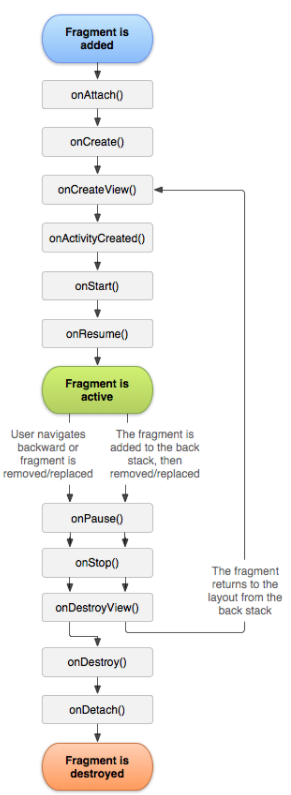
▶ onAttach(): Fragment가 Activity와 연결될 때 호출
▶ onCreate(): Fragment가 생성될때 호출
▶ onCreateView(): Fragment의 뷰를 그릴 때 호출되는 콜백
▶ onActivityCreated(): View가 만들어지고 난 후이며 이때부터 Fragment가 Activity에 온전히 접근 가능. view의 변경 작업 가능
▶ onStart(): Activity는 시작됨 상태
▶ onResume(): Fagment가 화면에 보여지며 사용자와 상호작용이 가능한 시점이다
============ Fragment is Activity ============
▶ onPause(): Fragment가 사용자의 Action과 상호 작용을 중지한다.
▶ onStop(): Fragment가 화면에서 더이상 보여지지 않게 되며, Fragment기능이 중지 되었을때 호출 된다.
▶ onDestoryView(): Fragment의 뷰가 소멸되는 시점이다.
▶ onDestory(): view가 제거된 후 Fragment가 완전히 소멸되기 전에 호출된다
▶ onDetach(): Fragment가 완전히 소멸되고, Activity와의 연결도 끊어질 때 실행된다
4. 프래그먼트 구체적 사용 이유
☝ 같은 화면을 다양한 기기에 대응
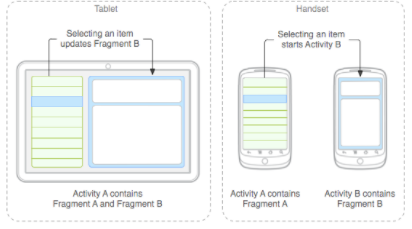
프래그먼트가 정의한 UI 모듈이 태블릿 환경에서는 하나의 액티비티로 조합될 수 있는 반면 모바일 단말기에서는 두 개의 액티비티로 분리되어 사용될 수 있다.
예를 들어 어플리케이션의 콘텐츠의 목록을 담고 있는 것을 Fragment A, 선택된 콘텐츠 목록에 대한 콘텐츠를 표시하는 것을 Fragment B라고 가정해본다.
애플리케이션을 태블릿 크기의 기기에서 실행하는 경우, 액티비티 안에서 Fragment A와 Fragment B를 조합해서 한 화면에 출력할 수 있다. 하지만 모바일에서는 그만큼의 공간을 제공하지 않으므로 액티비티 A에 Fragment A를 포함시켜 한 화면으로 출력하고 액티비티 B에서 Fragment B를 포함하여 한 화면에 출력한다.
즉, 애플리케이션은 서로 다른 조합으로 프래그먼트를 재사용함으로써 태블릿과 핸드폰 둘 다 지원해준다.
✌ 화면 중복 해결
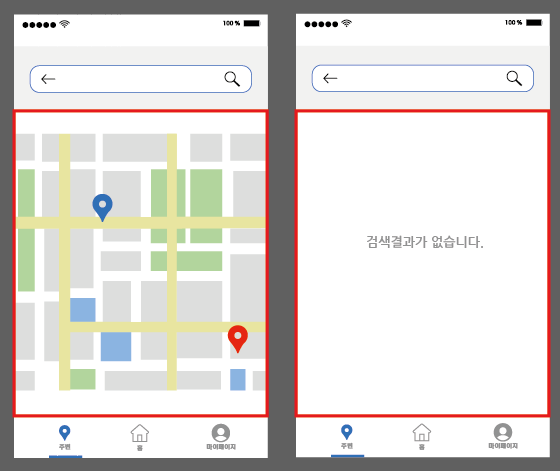
만약 위와 같은 지도 어플을 구현해본다고 생각해보겠다. 검색결과가 있을때와 없을 때, 빨간 상자의 내부에 해당되는 부분은 다르지만, 그 외의 부분은 같다.
이때 화면에 해당되는 Activity를 다 반복해서 만든다면, 화면의 반복으로 인한 비효율성이 반복될 것이다. 그래서! 저 빨간 네모 부분을 분리해서 만들어주기 위해 나온 것이 바로 프래그먼트이다.
5. 프래그먼트 관리 - 프래그먼트 트랜잭션
프래그먼트 트랜잭션의 사전적 정의는 '프래그먼트를 추가, 삭제 및 교체를 할 수 있다.' 지만 실제 안드로이드 내의 프래그먼트 트랜잭션은 '프래그먼트 백 스택관리', '프래그먼트 전환 애니메이션 설정' 등 생각보다 더 많은 일들을 수행 할 수 있다. 즉, 프래그먼트 내의 구성요소들에 접근을 할 수 있도록 해준다. 이를 통해 액티비티에서 특정 이벤트가 발생했을 때, 프래그먼트에서 적절한 UI 동작을 할 수 있도록 구현해준다.
6. 프래그먼트 구현 (실습)
1️⃣ 프래그먼트 생성
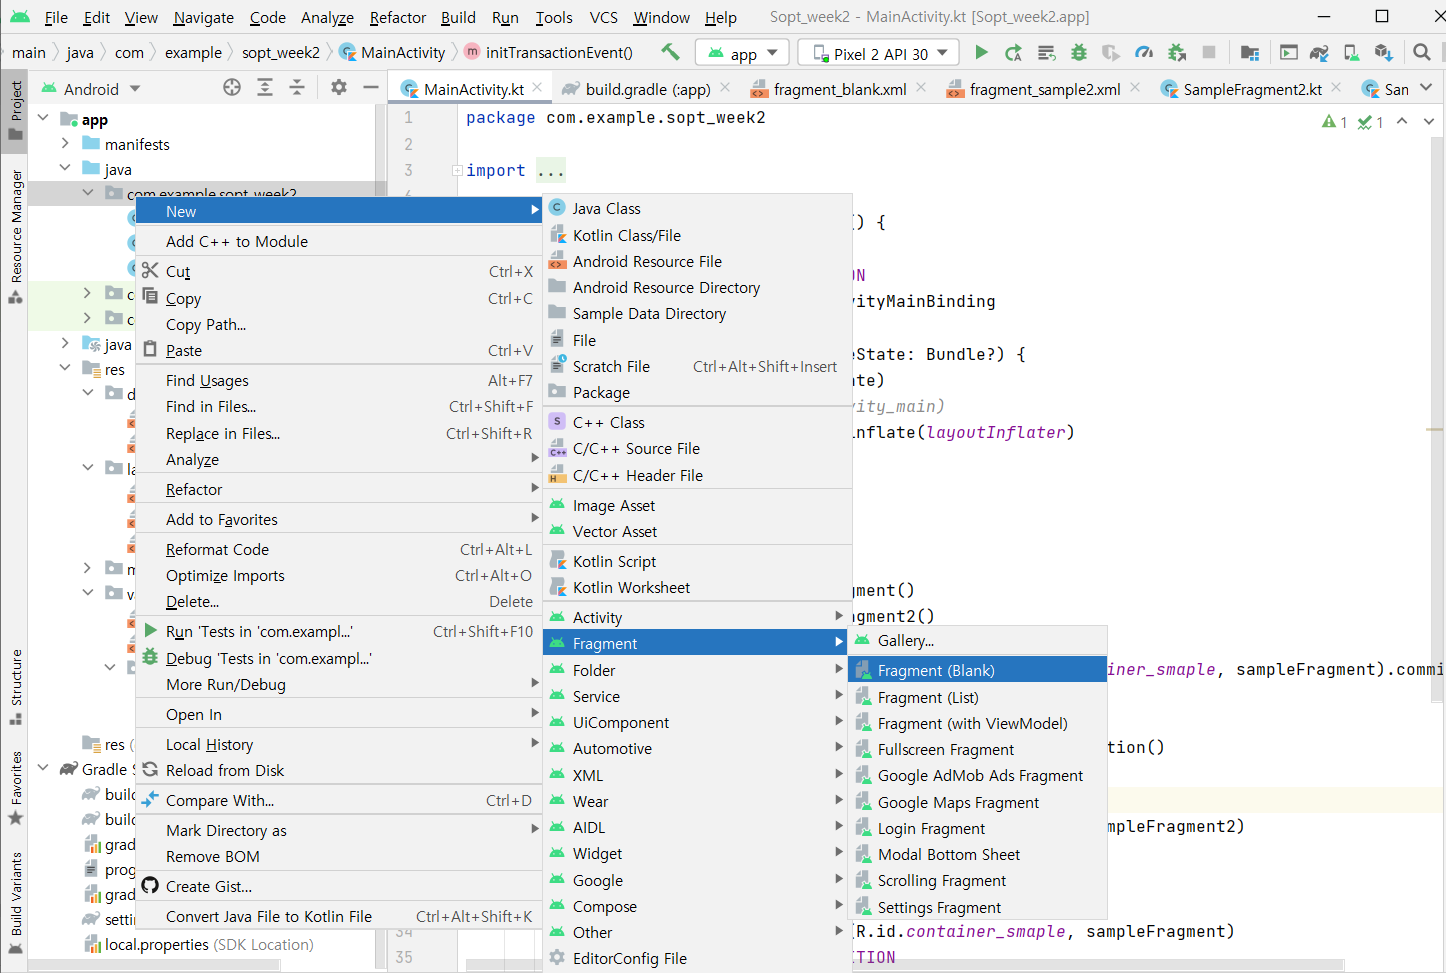
Fragment 생성하기 원하는 패키지 오른쪽 클릭 -> New -> Fragment -> Fragment(Blank)
2️⃣ UI의 초기화가 주로 이뤄지는 onCreateVIew() 메소드를 제외하고 다 지워준다.
package com.example.sopt_week2

import android.os.Bundle
import androidx.fragment.app.Fragment
import android.view.LayoutInflater
import android.view.View
import android.view.ViewGroup


class BlankFragment : Fragment() {
    override fun onCreateView(
        inflater: LayoutInflater, container: ViewGroup?,
        savedInstanceState: Bundle?
    ): View? {
        // Inflate the layout for this fragment
        return inflater.inflate(R.layout.fragment_blank2, container, false)
    }

}
3️⃣ Fragment의 xml 수정
<?xml version="1.0" encoding="utf-8"?>
<androidx.constraintlayout.widget.ConstraintLayout xmlns:android="http://schemas.android.com/apk/res/android"
    xmlns:app="http://schemas.android.com/apk/res-auto"
    xmlns:tools="http://schemas.android.com/tools"
    android:layout_width="match_parent"
    android:layout_height="match_parent"
    android:background="#F4C6C6"
    tools:context=".SampleFragment">

    <TextView
        android:layout_width="wrap_content"
        android:layout_height="wrap_content"
        android:text="첫번째 프래그먼트"
        app:layout_constraintBottom_toBottomOf="parent"
        app:layout_constraintEnd_toEndOf="parent"
        app:layout_constraintStart_toStartOf="parent"
        app:layout_constraintTop_toTopOf="parent" />

</androidx.constraintlayout.widget.ConstraintLayout>
두번째 프래그먼트와의 비교를 위해 background 색상과 text를 넣음.
4️⃣1~3 과정을 한번씩 더 반복하며 변경될 프래그먼트를 만들어준다
여기서 background 색상과 text를 다른 프래그먼트와 차별화 시켜주면 이동이 되는 것을 좀 더 직관적으로 확인할 수 잉있다.
5️⃣ Activity에 Fragment 띄우기 (activity_main.xml)
<?xml version="1.0" encoding="utf-8"?>
<androidx.constraintlayout.widget.ConstraintLayout xmlns:android="http://schemas.android.com/apk/res/android"
    xmlns:app="http://schemas.android.com/apk/res-auto"
    xmlns:tools="http://schemas.android.com/tools"
    android:layout_width="match_parent"
    android:layout_height="match_parent"
    tools:context=".MainActivity">

    <Button
        android:id="@+id/btn_change"
        android:layout_width="0dp"
        android:layout_height="wrap_content"
        android:layout_marginStart="10dp"
        android:layout_marginTop="20dp"
        android:layout_marginEnd="10dp"
        android:text="Button"
        app:layout_constraintEnd_toEndOf="parent"
        app:layout_constraintHorizontal_bias="0.498"
        app:layout_constraintStart_toStartOf="parent"
        app:layout_constraintTop_toTopOf="parent" />

    <androidx.fragment.app.FragmentContainerView
        android:id="@+id/container_smaple"
        android:layout_width="match_parent"
        android:layout_height="0dp"
        android:layout_marginTop="10dp"
        app:layout_constraintBottom_toBottomOf="parent"
        app:layout_constraintEnd_toEndOf="parent"
        app:layout_constraintStart_toStartOf="parent"
        app:layout_constraintTop_toBottomOf="@+id/btn_change"/>
</androidx.constraintlayout.widget.ConstraintLayout>
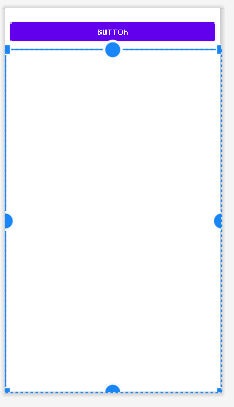
위의 코드를 작성하면 다음과 같은 레이아웃이 설계가 된다.
여기서 네모 상자인 FragmnetContainerView에서 Fragment를 띄울 수 있게 된다.
6️⃣ MainActivity 코드 작성
package com.example.sopt_week2

import androidx.appcompat.app.AppCompatActivity
import android.os.Bundle
import com.example.sopt_week2.databinding.ActivityMainBinding

class MainActivity : AppCompatActivity() {

	//이벤트 처리를 위한 변수
    private var postion = FIRST_POSITION
    private lateinit var binding: ActivityMainBinding

    override fun onCreate(savedInstanceState: Bundle?) {
        super.onCreate(savedInstanceState)
        //setContentView(R.layout.activity_main)
        binding = ActivityMainBinding.inflate(layoutInflater)
        setContentView(binding.root)
        initTransactionEvent()
    }

    fun initTransactionEvent() {
    	//만들어둔 Fragment 생성
        val sampleFragment = SampleFragment()
        val sampleFragment2 = SampleFragment2()

	//SupportFragmentManager로 FragmentManager를 호출
        supportFragmentManager.beginTransaction().add(R.id.container_smaple, sampleFragment).commit()

	//beginTranscation을 통해 트랜잭션 작업 생성
       binding.btnChange.setOnClickListener {
           val transaction = supportFragmentManager.beginTransaction()
           when(postion) {
               FIRST_POSITION -> {
                   transaction.replace(R.id.container_smaple, sampleFragment2)
                   postion = SECOND_POSITION
               }
               SECOND_POSITION -> {
                   transaction.replace(R.id.container_smaple, sampleFragment)
                   postion = FIRST_POSITION
               }
           }

           //작업 수행
           transaction.commit()
       }
    }

    //가독성을 위한 상수값 선언
    companion object {
        const val FIRST_POSITION = 1
        const val SECOND_POSITION = 2
    }
}
소스코드의 주석 참고
✍ 과제하다가 나온 오류에 대한 풀이
버튼을 클릭하여 아이템이 선택될 때마다 그에 맞는 Fragment를 보여주는 코드를 작성하다가 나온 오류
Error msg : java.lang.IllegalStateException: commit already called
한번 commit이 실행된 Transaction을 다시 commit하면 발생하는 오류이다. Fragment에 관한 변경 사항을 commit()할 때마다 beginTransaction()으로 FragmentTransaction을 새로 만들어 주어야 한다.
즉, Item을 선택할 때 마다 새로운 transaction을 따로 만들어 주어 commit 해야한다.
7️⃣ 실행화면 캡쳐
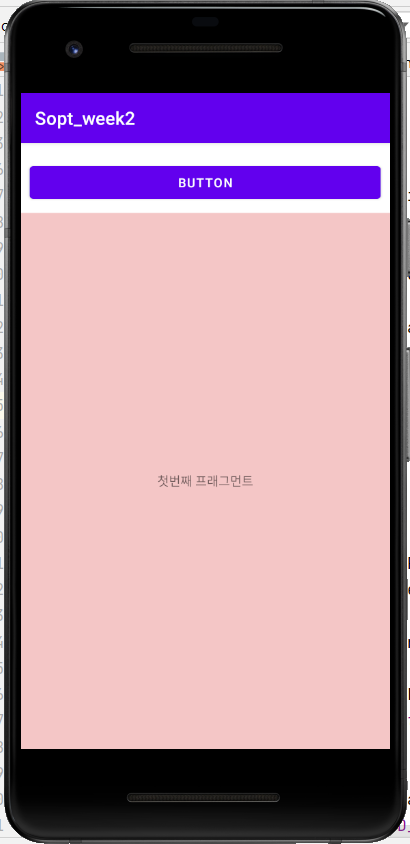
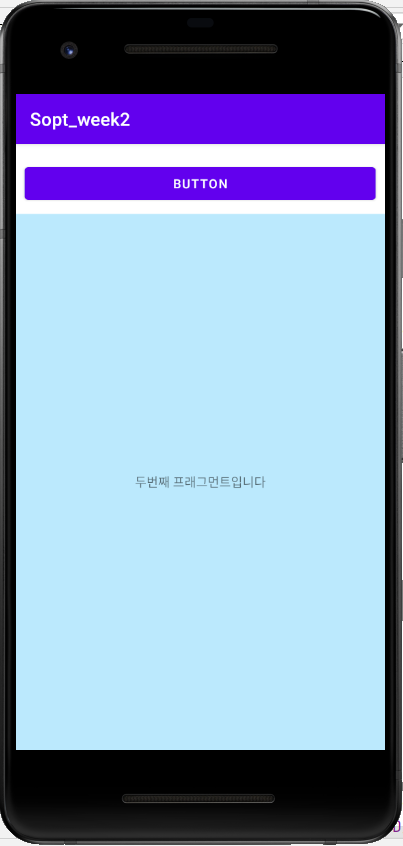
- 처음 화면에 뜨는 default는 FIRST_POSITION에 해당되는 첫번째 프래그먼트
- 좌측의 화면에서 상단의 버튼을 클릭하면 우측의 SECOND_POSITION인 두번째 프래그먼트로 이동
- 우측의 화면에서 상단의 버튼을 클릭하면 좌측의 FIRST_POSITION인 첫번째 프래그먼트로 이동
7. 프래그먼트에서 view binding 사용 (안드로이드 스튜디오 공식 문서 참고)
onCreateView() 메소드에서 단계 실행
- inflate()생성된 바인딩 클래스에 포함된 정적 메서드를 호출한다. 이것은 사용할 프래그먼트에 대한 바인딩 클래스의 인스턴스를 생성한다.
- getRoot()메서드 를 호출 하거나 Kotlin 속성 구문을 사용하여 루트 보기에 대한 참조를 가져온다.
- onCreateView()메서드 에서 루트 뷰를 반환하여 화면에서 활성 뷰로 만든다.
private var _binding: ResultProfileBinding? = null
// This property is only valid between onCreateView and
// onDestroyView.
private val binding get() = _binding!!

override fun onCreateView(
    inflater: LayoutInflater,
    container: ViewGroup?,
    savedInstanceState: Bundle?
): View? {
    _binding = ResultProfileBinding.inflate(inflater, container, false)
    val view = binding.root
    return view
}

override fun onDestroyView() {
    super.onDestroyView()
    _binding = null
}
* Fragment는 오래 지속되므로 onDestroyView() 메소드에서 binding 클래스 인스턴스에 대한 참조를 정리해줘야한다.
binding.name.text = viewModel.name
binding.button.setOnClickListener { viewModel.userClicked() }
위와 같이 코드를 작성하면 아래와 같이 클래스의 인스턴스를 사용해서 참조를 할 수 있다.
안드로이드 스튜디오 공식 문서와 안드로이드 파트장님이 준비해주신 세미나 내용을 참고하면서 직접 이해한 내용을 바탕으로 작성했습니다.
'ⓢⓣⓤⓓⓨ > ⓐⓝⓓⓡⓞⓘⓓⓢⓣⓤⓓⓘⓞ' 카테고리의 다른 글
| [Kotlin] BottomNavigation (0) | 2021.10.31 |
|---|---|
| [Kotlin] ViewPager (뷰 페이저) (0) | 2021.10.24 |
| [Kotlin] 파이어베이스 연동하는 법 (0) | 2021.09.09 |
| [Kotlin] 타이머 만들기 (0) | 2021.09.04 |
| [Kotlin] 조건문, 반복문 정리 (0) | 2021.08.31 |


댓글